Thursday 10 April 2014

Liferay 6.2 + Sentiment analysis with Alchemy API

Hi Guys,

In this era of IT industries transforming words into knowledge is much more useful and alchemy API is just the right thing to do these things and many more.

This post is just of an overview or you can say just a meet up what exactly Alchemy API is and how does it work.

Now you can easily perform sentiment analysis, keyword extraction, entity extraction, image tagging and much more on the massive volumes of web pages, documents, tweets and photos produced every second with Alchemy API.

In this post we are going to do sentiment analysis of the blog entry written in liferay sites and it will give xml output for each blog entry on console. You can also use search container or any document generator API for listing out the result.

I am providing you very basic and raw example.

Lets get started...

1) First of all you have to get register key for your application in which you are using this particular API.
You can get free API key here.

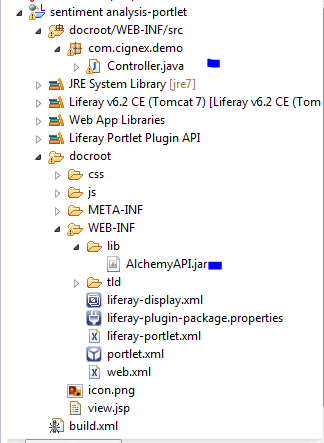
2) Create one simple MVC portlet as shown in below image.


3) Now download Alchemy SDK (specific to java language) from this link.

4) Now Extract that sdk and go to the path where build.xml resides and run "ant jar" command from the cmd and it will create AlchemyAPI.jar file in dist folder.

5) Copy that jar file into our portlet lib folder and we are ready to go.

6) Open view.jsp file and copy below content in it.


 <%@ taglib uri="http://alloy.liferay.com/tld/aui" prefix="aui" %>  
 <%@ taglib uri="http://java.sun.com/portlet" prefix="portlet" %>  
 <portlet:defineObjects/>  
 <aui:a href='<%= renderRequest.getParameter("url")%>'><%= renderRequest.getParameter("url")%></aui:a>  
 <portlet:actionURL name="doAnalyze" var="doAnalyze"></portlet:actionURL>  
 <aui:button value="Analyze" onClick="<%=doAnalyze %>" name="Analyze"></aui:button>  
 This is the <b>Sentiment Analysis</b> portlet.  

7) Open controller.java class which is our mvcPortlet class and copy below content in it.


 package com.cignex.demo;  
 import java.io.IOException;  
 import java.io.StringWriter;  
 import java.util.Iterator;  
 import java.util.List;  
 import javax.portlet.ActionRequest;  
 import javax.portlet.ActionResponse;  
 import javax.portlet.PortletException;  
 import javax.xml.parsers.ParserConfigurationException;  
 import javax.xml.transform.Transformer;  
 import javax.xml.transform.TransformerException;  
 import javax.xml.transform.TransformerFactory;  
 import javax.xml.transform.dom.DOMSource;  
 import javax.xml.transform.stream.StreamResult;  
 import javax.xml.xpath.XPathExpressionException;  
 import org.w3c.dom.Document;  
 import org.xml.sax.SAXException;  
 import com.alchemyapi.api.AlchemyAPI;  
 import com.liferay.portal.kernel.exception.SystemException;  
 import com.liferay.portlet.blogs.model.BlogsEntry;  
 import com.liferay.portlet.blogs.service.BlogsEntryLocalServiceUtil;  
 import com.liferay.util.bridges.mvc.MVCPortlet;  
 public class Controller extends MVCPortlet {  
      public void doAnalyze(ActionRequest actionRequest,  
                ActionResponse actionResponse) throws IOException, PortletException {  
           try {  
                List<BlogsEntry> blogEntryList = BlogsEntryLocalServiceUtil.getBlogsEntries(0, BlogsEntryLocalServiceUtil.getBlogsEntriesCount());  
                System.out.println("number of blogs:"+blogEntryList.size());  
                for (Iterator iterator = blogEntryList.iterator(); iterator.hasNext();) {  
                     BlogsEntry blogsEntry = (BlogsEntry) iterator.next();  
                     AlchemyAPI alchemyObj = AlchemyAPI.GetInstanceFromString("yourtapikey");  
                     try {  
                          Document doc = alchemyObj.TextGetTextSentiment(blogsEntry.getContent());  
                          System.out.println(getStringFromDocument(doc));  
                     } catch (XPathExpressionException e) {  
                          // TODO Auto-generated catch block  
                          e.printStackTrace();  
                     } catch (SAXException e) {  
                          // TODO Auto-generated catch block  
                          e.printStackTrace();  
                     } catch (ParserConfigurationException e) {  
                          // TODO Auto-generated catch block  
                          e.printStackTrace();  
                     }  
                }  
           } catch (SystemException e) {  
                e.printStackTrace();  
           }  
      }  
       private static String getStringFromDocument(Document doc) {  
          try {  
            DOMSource domSource = new DOMSource(doc);  
            StringWriter writer = new StringWriter();  
            StreamResult result = new StreamResult(writer);  
            TransformerFactory tf = TransformerFactory.newInstance();  
            Transformer transformer = tf.newTransformer();  
            transformer.transform(domSource, result);  
            return writer.toString();  
          } catch (TransformerException ex) {  
            ex.printStackTrace();  
            return null;  
          }  
        }  
 }  

Please note that you have to replace your registered api key in above code other wise you will get exception.

8) Deploy the portlet and put it on the page and click analyse button you will get sentiment analysis as a result.


9) Output result:


Done :) now you can also play with AlchemyApi and can get meaning full data do lot more then this.

GOOD DAY


Sunday 6 April 2014

Liferay Mobile SDK+ Android + Custom Services part-3

Hello again,


Please refer Liferay Mobile SDK + Custom Services part-2 for getting idea of what this post is all about.

Now lets see how to use that custom service jar in your native android application.


if you are Android Developer then it will be peace of cake for you because you just have to add that jar in your classpath and direclty make a Asynchronous call of that particular method from the application.


Now lets start step by step,


1) In previous post we have already added that jar in android classpath project.


2) For practise you can download sample android app here.


3) Android doesn't allow synchronous HTTP requests, You can only make them from different threads; for example, from within an AsyncTask instance.

The SDK can help you make asynchronous HTTP requests if you don't want to create an AsyncTask yourself. It makes the service call from an AsyncTask and you can pass a callback that is invoked after the request finishes.
Set a callback class implementation to the session and all the following service calls will be asynchronous. Set it back to null if you want to make synchronous calls again.
This thing you can check in your sample android application.
If we want to call our custom services which we have developed in Part-1 then we have to call that service like below.

 AsyncTaskCallback callback = new IntegerAsyncTaskCallback() {  
   public void onFailure(Exception exception) {  
     // Implement exception handling code  
   }  
   public void onSuccess(int result) {  
     // Called after request has finished successfully  
   }  
 };  
 session.setCallback(callback);  
 customservice.getPotraitId(userId);  


When a ServerException occurs, it's because something went wrong on the server side. For example, if you pass a userId that doesn't exist, the portal will complain about it and the SDK will wrap the error message with a ServerException.
There are many AsyncTaskCallback implementations, one for each service method return type: JSONObjectAsyncTaskCallbackJSONArrayAsyncTaskCallbackStringAsyncTaskCallbackBooleanAsyncTaskCallbackIntegerAsyncTaskCallbackLongAsyncTaskCallback, and DoubleAsyncTaskCallback. Pick the appropriate implementation for your service method return type. In the example above, since getPotraitId returns a Integer, you must use the IntegerAsyncTaskCallback instance.
It's also possible to use a generic AsyncTaskCallback implementation called GenericAsyncTaskCallback. For this implementation, you must implement a transform method and handle JSON parsing by yourself.
Since the request is asynchronous, service.getPotraitId returns immediately with a null object. The result will be passed to the callback onSuccess method instead.
You can also invoke batch commands the SDK allows sending requests using batch processing..You can explore API by yourself for that ;)
Thanks...
GOOD DAY

Friday 4 April 2014

Liferay Mobile SDK + Android + Custom Services part-2

Hello guys,

Please refer Liferay Mobile SDK + Custom Services part-1 for getting idea of what this post is all about.

Now we have our service running on our local server and also we have Liferay mobile SDK for building custom jar.

Lets see how to do it,

1) Go to downloaded Liferay Mobile SDK folder (picture shown below)


2) This project already ships the Gradle Wrapper (gradlew) with it, you don't need to install Gradle's command line tool (gradle).
 Now you have to set some properties before building 
  1. Edit gradle.properties, if you don't want to change that file directly, you can also copy it to ~/.gradle and modify it there. Alternatively, you can also edit the gradle.properties inside each platform folder (ios/ or android/).
  2. Here are the important properties to set:
    • url - The URL to your Liferay instance.
    • context - Your portlet's web context. Say for example you are generating an SDK for Liferay's Calendar portlet, which is generally deployed to the calendar-portlet context, then you should set your context value to context=calendar-portlet. Under the hood, the SDK Builder will try to access http://localhost:8080/calendar-portlet/api/jsonws?discover to find out which services are available for this portlet. Check in a browser if this URL is working before running the SDK. If it's not running, you may have forgotten to run ant build-wsdd on the portlet.
    • filter - Specifies your portlet's entities whose services to access; a blank value indicates the services of all of the portlet's entities. For example, the Calendar portlet has entities such as CalendarBooking and CalendarResource. To generate an SDK for only the CalendarBooking entity, set the filter's value to calendarbooking, all in lowercase. The SDK Builder will then make requests to the http://localhost:8080/calendar-portlet/api/jsonws?discover=/calendarbooking/*. If you set filter=, specifying no filter value, the remote services of all of the portlet's entities will be made available to your mobile SDK.
    • package - On Android, this is the package to which your SDK's classes are written. The iOS platform does not use packages. Note, that the Liferay Portal version is appended to the end of the package name. So, if you specified com.liferay.mobile.android as your package, the SDK Builder appends the Liferay Portal version (e.g., v62) to it, like com.liferay.mobile.android.v62. Appending the Liferay Portal version prevents collisions between classes with the same names written for different versions of Liferay Portal.
    • destination - Specifies the root folder in which to save your generated files. On Android, by default, the files are saved to android/src/gen/java. On iOS, the files are saved by default to ios/src/gen.
    • version - The version number is appended to the jar and zip file names, see more about that in the following sections.
Example file for our portlet is given below:


 ##  
 ## SDK Builder  
 ##  
      url=http://localhost:8080  
      context=custom-mob-app-service-portlet   
      filter=  
      packageName=com.liferay.mobile.android//you can provide custom name 
      destination=gen  
 ##  
 ## Build  
 ##  
      version=6.2.0.1  


"custom-mob-app-service-portlet" is our deployed portlet on local server.Filter is empty because we want all other default services.
Save it.

3.To build the service related source files for your Liferay Android SDK, run the following command from the android/ folder:
gradlew buildService
The source files are written to the android/src/gen/java folder by default.
To build a .jar file containing the generated service and utility classes, run the following command:
gradlew jar
The liferay-android-sdk-[version].jar file is written to your android/build/libs folder. You're ready to use the liferay-android-sdk-[version].jar in your Android project, there are no external dependencies.
4. Within your Android project, drop the JAR into the /libs folder. Android Developer Tools should automatically add this JAR to your classpath. If you are using a different IDE, make sure this JAR is added to the project classpath.

ANDDD Done...

Now you can use that custom services of "custom-mob-app-service-portlet" in your android app without knowing any Liferay side coding ;)

Please note that the custom service name would be the name of the entity defined in service.xml file which we have seen in 1st Part of the POST.

Still yes still ....In the next post we are going to see how you can do Async call of Liferay services in android app.

see you soon...:D
NEXT

Liferay Mobile SDK + Android + Custom Services part-1

Hi guys,

Today we are going to see how can we use Liferay custom services in ANDROID native app...!!

And we are going to see how can anyone build custom services with lifeary mobile sdk  and use that jar in native android app.

Why we need liferay mobile sdk ?? So for answer for that question,  Since the SDK is auto-generated, it also means that you can generate client side code for your custom portlet services as well and Our Liferay Mobile SDK makes it easier to create mobile apps that are connected to Liferay portals, it takes care of authentication, services discovery, JSON parsing and server error handling for you.

Lets start step by step......

First we create one custom service which gives user potraitId from the UserId. Because there are no service for getting potraitId from the userId in current sdk jar,So we have to build a new jar which is having this custom service which serve our purpose for showing Avatar image of User.

1) Create portlet for custom services (these service you are going to use in android app)
       --> Create simple liferay portlet with service (Refer below link to download portlet)
      download custom service portlet
please note that this portlet is compatible with Liferay6.2 because liferay mobile sdk supports Lifeary 6.2 version.
       --> After download you have to first build service -> build-wsdd -> build-wsdl
       --> Deploy this portlet on liferay 6.2
       --> For Cross check,Is your portlet services running or not ??You can hit below URL and check your custom service response with default interface provided by liferay(From the drop down you can select your portlet)
            http://localhost:8080/api/jsonws

2) You can download liferay mobile sdk from below url
       Liferay mobile sdk

3) Now we have to build custom jar for our custom services which are already deployed on the local server in first step.(Please verify your services are running, other wise SDK is unable to build jar with custom service)

Please stay tune for  building custom jar and how to call your custom service in native android application.
Next GOOD DAY...